Overview
Time: 5min
In this lesson, we will create a new admin component in it's own module. This is significant as it will demonstrate the lazy loading features of Angular.
Generate the AdminModule
Time: 5 min
- Open a command prompt and generate a new admin module
ng g module admin --routing
Generate the AdminComponent
Time: 5 min
- Open a command prompt and generate a new admin component
- Add the component to the AdminModule
ng generate component admin --skip-tests --module admin
src/app/admin/admin.module.ts
import { NgModule } from '@angular/core';
import { CommonModule } from '@angular/common';

import { AdminRoutingModule } from './admin-routing.module';
import { AdminComponent } from './admin.component';

@NgModule({
  imports: [
    CommonModule,
    AdminRoutingModule
  ],
  declarations: [AdminComponent]
})
export class AdminModule { }
Configure the routing
Time: 5 min
- Add the lazy loaded path to the routes for the admin module to the app routes
src/app/app-routing.module.ts
const routes: Routes = [
      { path: '', redirectTo: 'company/list', pathMatch: 'full' },
      { path:  'company/list',  component:  CompanyListComponent },
      { path: 'company/edit/:id', component: CompanyEditComponent },
      { path: 'admin', loadChildren: () => import('./admin/admin.module').then(m => m.AdminModule) },
];
- The --routing flag when creating the admin module added the
admin-routing.module.tsroutes for the admin module. - Add the below route to the
admin-routing.module.tsfile.
src/app/admin/admin-routing.module.ts
import { NgModule } from '@angular/core';
import { Routes, RouterModule } from '@angular/router';
import { AdminComponent } from './admin.component';

const routes: Routes = [
  { path: '', component: AdminComponent }
];

@NgModule({
  imports: [RouterModule.forChild(routes)],
  exports: [RouterModule]
})
export class AdminRoutingModule { }
How routing is added to the AdminModule
Time: 1 min
- This Admin routing configuration is imported into the Admin module as
AdminRoutingModule - This was created for you by the
--routingflag when generating theAdminModule
src/app/admin/admin.module.ts
import { NgModule } from '@angular/core';
import { CommonModule } from '@angular/common';

import { AdminRoutingModule } from './admin-routing.module';
import { AdminComponent } from './admin.component';

@NgModule({
  imports: [
    CommonModule,
    AdminRoutingModule
  ],
  declarations: [AdminComponent]
})
export class AdminModule { }
Update the app component template
Time: 5 min
- Add a navigation bar to app.component.html.
- Add a link to the admin component
src/app/app.component.html
<nav class="navbar navbar-light bg-faded">
  <a class="navbar-brand" [routerLink]="['/']">FireBootCamp CRM</a>
  <ul class="navbar-nav ml-auto">
    <li class="nav-item" [routerLinkActive]="'active'">
      <a class="nav-link" [routerLink]="['/company/list']">
        Companies (<span id="company-count">{{ companyCount$ | async }}</span>)
      </a>
    </li>
    <li class="nav-item" [routerLinkActive]="'active'">
      <a class="nav-link" [routerLink]="['/admin']">Admin</a>
    </li>
  </ul>
</nav>
<div class="container">
  <router-outlet></router-outlet>
</div>
Test lazy loading
Time: 5 min
- First navigate to the below route with a hard refresh in the browser. This should not load the AdminModule bundle.
http://localhost:4200/company/list
- Clear the network traffic in your Chrome browser and navigate to the below link and you will see the AdminModule bundle of JavaScript is downloaded.
http://localhost:4200/admin
Bundle for deployment
Time: 15 min
Production Package
- Run the following command to make a ./dist folder to put on any web server.
ng build --prod
- You can run the build command with serve to see fee the performance difference.
ng serve --prod
EXTRA Environment variables
Time: 10 min
You can use environment variable to dynamically replace any values (API endpoint for example) at build time.
- Run the following command to add the required configuration to your project (Ng15+)
ng g environments --interactive
Notice a couple files have been added, and angular.json file has been updated.
src/environments/environment.ts
(default variables)
export const environment = {
  production: false,
  API_BASE : 'http://app-fbc-crm-api-prod.azurewebsites.net/Test/api'
};
src/environments/environment.prod.ts
('prod' variables)
export const environment = {
  production: true,
  API_BASE : 'http://app-fbc-crm-api-prod.azurewebsites.net/api'
};
src/app/company/company/service.ts
('prod' variables)
import { environment } from '../../environments/environment';
...
  API_BASE = environment.API_BASE;
...
- Setup API_BASE variable in both environment configuration files
- Replace current API_BASE value in service by the dynamic value coming from environment
- Test environment will now break because the endpoint does not exist, but production build will work fine
(The setup for the file replacement can be find in Angular.json)
angular.json
"configurations": {
    "production": {
        "fileReplacements": [
            {
                "replace": "src/environments/environment.ts",
                "with": "src/environments/environment.prod.ts"
            }
        ],
    ...
    }
...
},
EXTRA 2 Webpack Bundle Analyzer
Time: 15 min
In this section, we will run some analysis tools to inspect the size of our application.
- Install the webpack-bundle-analyzer
npm install --save-dev webpack-bundle-analyzer
- Once installed add the following entry to the npm scripts in the package.json:
    "build:stats": "ng build --stats-json",
    "analyze": "webpack-bundle-analyzer dist/firebootcamp-crm/stats.json",
npm run build:stats
- Run the following command
npm run analyze
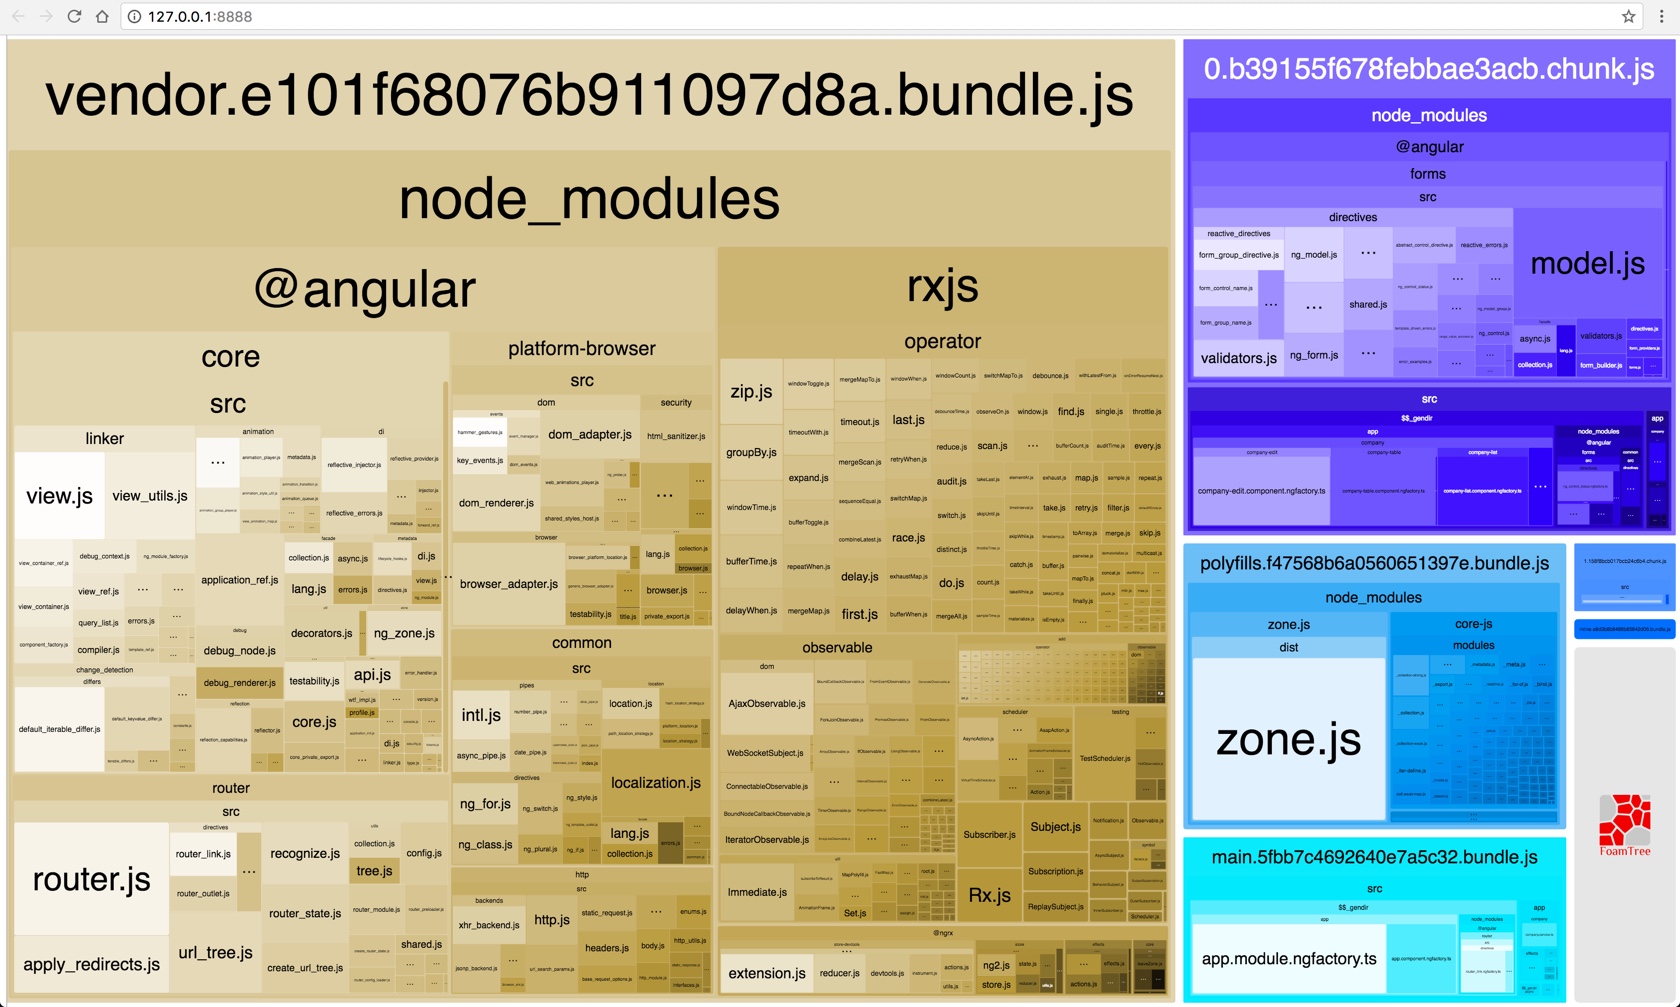
Figure: webpack-bundle-analyzer in the browser