Overview
Time: 5 min
Core to Angular is the component architecture. In order to have multiple components they need to communicate with each other. In this module we investigate how to make this happen.
Learning Outcomes: (What we want to know/understand)
- Understand the component model
- Understand communication between components
- Learn how to nest components
- Learn how to add metadata to components
- Learn how to use Angular Input and Outputs for component communication
Create a new Angular CLI application
Time: 5min
- In the folder you would like to create this project run the following command
ng new hello-world --prefix fbc
- Change directory into the new project and open the CLI in Visual Studio Code
cd hello-world && code .
- Run the application
ng serve
- Open the application in your web browser at http://localhost:4200
Understanding Angular component architecture with component trees
Time: 5 min
Hello World - A single component application
Currently our counter component only has one component and that is our top level <my-app></my-app> component.
It contains our Component class, the Html template and the metadata to bind the two together.
Our next step is to add more components to our application and to get them to communicate.

Figure: Angular component with 4 main parts the component, template, bindings and metadata
Component Trees
Before we add more components, it is worth stepping back for a minute and thinking about how multiple components would look like as a component tree.
Angular forms a tree of components. We add one top level component - the 'app' component, and then we embed multiple other components in that component. We continue to add components to components until our application is built. This forms a tree structure.
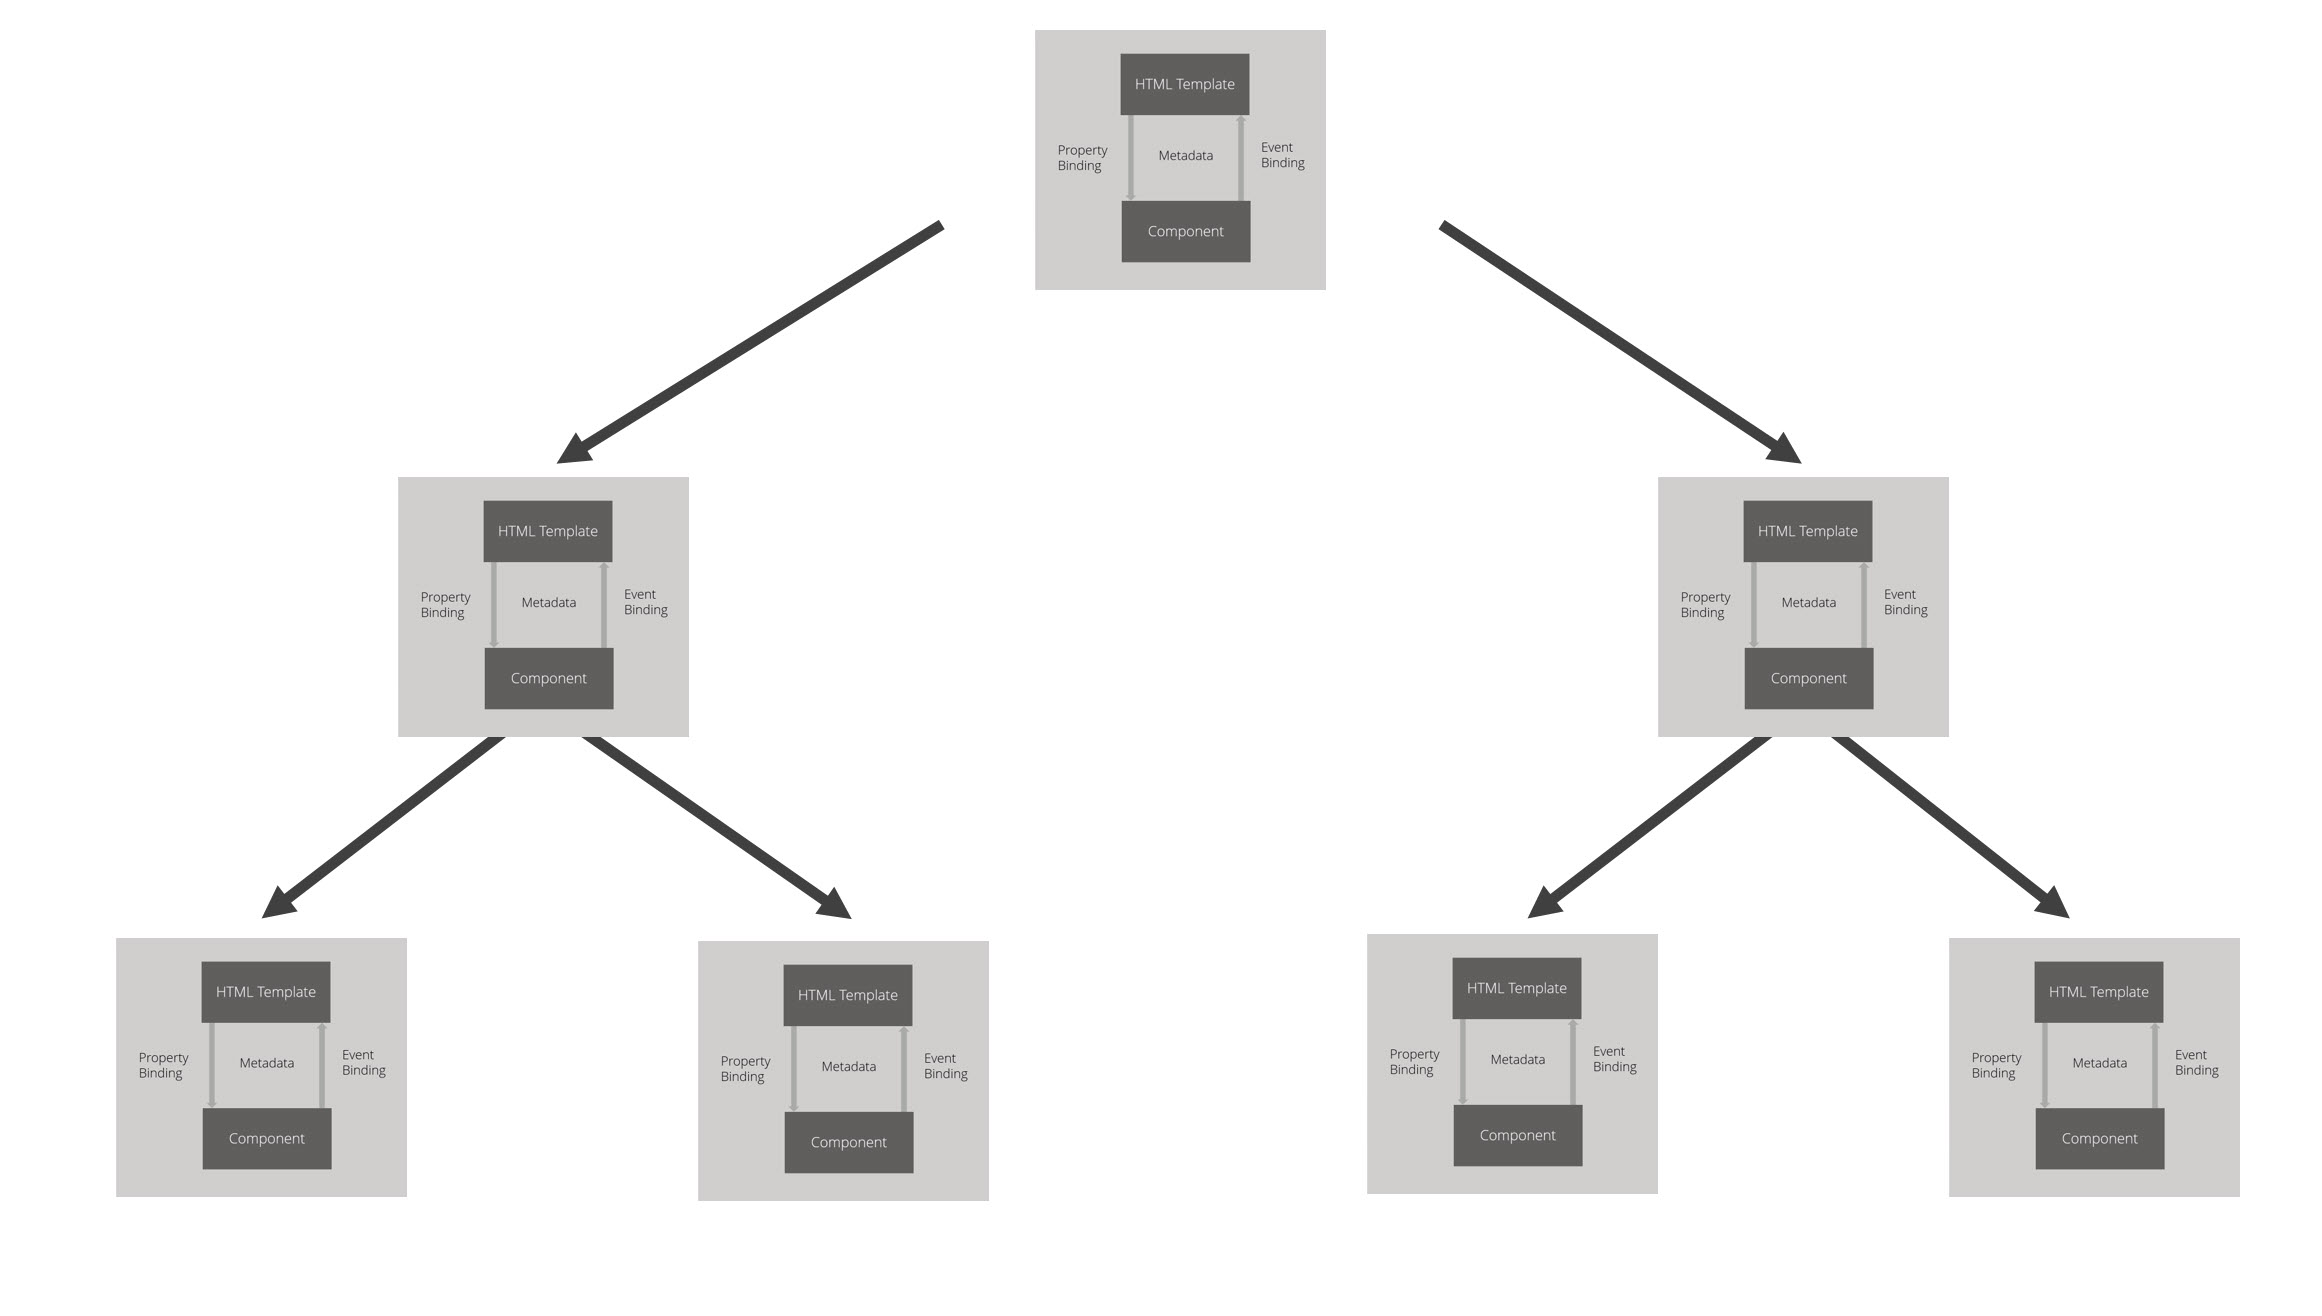
Figure: Angular component tree
Component Structure of the Counter application
In our case we will have the <app></app> component at the top with a child <counter></counter> component which has its own child component the <counter-logic></counter-logic> component that does the adding and subtracting of the counterValue.

Figure: Counter exercise component tree
Create the counter component
Time: 5 min
- Add "counter" folder underneath the app folder
- Add a "counter.component.ts" file in the new counter folder
- Add the shell of the counter component from the below snippet
- Notice that a style can be specified that applies only to this component
import { Component } from '@angular/core';

@Component({
    selector: 'counter',
    styles: [`div { border: solid 1px blue; margin: 10px; padding: 10px; }`],
    template: `
        <div>
            <h2>Counter Component</h2>
        </div>
        `
})
export class CounterComponent {}
App Module - Import and register the counter component
Time: 5 min
-
Open
app.module.ts -
Add the import statement
import { CounterComponent } from './counter/counter.component';
- Add the counter component to the app module's declarations array to tell Angular that the CounterComponent belongs to this Angular Module
declarations: [ AppComponent, CounterComponent ],
The CounterComponent can now be used on any Component in this module.
AppComponent: Add the counter component to the template
Time: 5 min
-
Open
app.component.ts -
Add some styling, and a heading to make the component boundaries clear for our explanation
    @Component({
        selector: 'my-app',
        styles: [`div { border: solid 1px red; margin: 10px; padding: 10px; }`],
        template: `
            <div>
                <h2>App Component</h2>
            </div>
        `
    })
- Add the
element to the app component template.
The finished component should resemble the following.
    import { Component } from '@angular/core';

    @Component({
        selector: 'my-app',
        styles: [`div { border: solid 1px red; margin: 10px; padding: 10px; }`],
        template: `
            <div>
                <h2>App Component</h2>
                <counter></counter>
            </div>
        `
    })
    export class AppComponent {}
- In the browser notice that you now have the CounterComponent embedded inside the AppComponent
CounterComponent - Initialise the "currentValue" property to the counter component's model
Time: 5 min
When we instantiate a CounterComponent, we want it to have an initial value of 5.
-
Open
counter.component.ts. -
Initialise a
currentCountproperty as a type of number with a value of 5
export class CounterComponent {
    currentValue: number = 5
}
- Add a property binding to the counter component HTML template
    template: `
        <div>
            <h2>Counter Component</h2>
            <p>Count: {{currentValue}}</p>
        </div>
        `
Create the counter-logic component
Time: 5 min
The counter logic component is the child component of the CounterComponent.
The CounterComponent is going to display the currentValue, but when operations are going to be performed that change the value of currentValue they are going to be performed by the CounterLogic component.
- Add a "counter-logic.component.ts" file in the counter folder
- Add the code to create the shell of a counter-logic component
    import { Component} from '@angular/core';

    @Component({
        selector: 'counter-logic',
        styles: [`div { border: solid 1px green; margin: 10px; padding: 10px; }`],
        template: `
            <div>
                <h4>Counter Logic Component</h4>
            </div>
        `
    })
export class CounterLogicComponent {}
Add the logic component to the Angular Module
Time: 5 min
-
open app.module.ts
-
add the import for the CounterLogicComponent
import { CounterLogicComponent } from './counter/counter-logic.component';
- add the CounterLogicComponent to the declarations to make it available to be used by other components in the Angular Module
declarations: [ AppComponent, CounterLogicComponent, CounterComponent],
Add the logic component onto the CounterComponentTemplate
- open counter.component.ts and add the CounterLogicComponenet
    template: `
        <div>
            <h2>Counter Component</h2>
            <p>Count: {{currentValue}}</p>
            <counter-logic></counter-logic>
        </div>
        `
- refresh the page and observe the nested component structure
CounterLogicComponenet: Allow values to be passed in (via @Input )
Time: 5 min
The CounterComponent maintains the value of the counter in the currentValue property.
To be able to pass this value from the parent component (CounterComponent) to the child component (CounterLogicComponent) the child component specifies that it accepts values via an @Input property.
- Import
Inputfrom '@angular/core'
import { Component, Input } from '@angular/core';
- Add an Angular input property to the CounterLogicComponent class and initialise it to 0 which will be overidden by the incoming
currentCountvalue from the parent counter component, which is initialised to 5.
@Input() counterValue: number = 0;
CounterComponent: Add the logic component and pass in the currentValue
Time: 5 min
Now that the CounterLogicComponent can accept values being passed into it, we need to update the parent component to add the counterlogic component and to actually pass in the value. We do this by specifying a property binding on the counter-logic template.
- Update the
counter-logiccomponent to specify thecounterValueas having a value equal tocurrentValue.
<counter-logic [counterValue]="currentValue"></counter-logic>
Note:
counterValueis the name of the property on the CounterLogicComponent (child). This is being set to the value ofcurrentValue, which is the name of the property on the CounterComponent (parent).
The CounterComponent should now look like this:
import { Component } from '@angular/core';

@Component({
    selector: 'counter',
    styles: [`div { border: solid 1px blue; margin: 10px; padding: 10px; }`],
    template: `
        <div>
            <h2>Counter Component</h2>
            <p>Count: {{currentValue}}</p>
            <counter-logic [counterValue]="currentValue" ></counter-logic>
        </div>
        `
})
export class CounterComponent {
    currentValue: number = 5
}
Review our handy-work
Time: 5 min
We have seen how to pass information down from a parent component to a child component.
If we look at our app in the browser we can see that the value from the parent CounterComponent is being passed into the CounterLogicComponent and being rendered correctly.
In the next section we will look at passing events up from the children to the parents.
CounterLogicComponent: Add buttons for 'add' and 'subtract'
Time: 5 min
As well as passing values into the CounterLogicComponent, we need to know how to make changes in a child component and be able to pass the new value back up to the parent component.
What we are going to do next is add buttons onto the child component. When the buttons are clicked they are going to notify the parent component of the change to the counter value.
We are going to do this by using the @Output decorator and EventEmitters.
- Add two buttons with corresponding click event handlers to the template and a label for counterValue
template: `
    <button class="btn btn-default" (click)="add()">add</button>
        <label>{{ counterValue }}</label>
    <button class="btn btn-default" (click)="subtract()">subtract</button>
`
- Add the add and subtract functions to the CounterLogic component class
add() {
    this.counterValue++;
}

subtract() {
    this.counterValue--;
}
CounterLogicComponent: Add the Angular @Output property and listen for change events
Time: 5 min
The next step is we need to raise an event in the child component that our parent counter component can listen for.
Any time we update the counter-logic components currentCount value we want to raise the event in the child, and have it handled by the parent.
- Add imports for the Input, Output and EventEmitter modules from '@angular/core'
import { Component, Input, Output, EventEmitter } from '@angular/core';
@Input declares a data-bound input property that allows values to be passed into a component.
@Output declares an event-bound output property. When an output property emits an event, an event handler attached to that event the template is invoked.
The EventEmitter class is used by directives and components to emit custom Events.
- Add the @Output property below the @Input property and initialise it with a new number EventEmitter
@Output() counterChanged = new EventEmitter<number>();
We will see later how we can now add <counter-logic (counterChanged)="somefunctionname()"> to the parent component to handle the counterChanged output property.
- Now that we have a new event emitter we want to raise an event every time we add or subtract a value from the
counterValue
add() {
    this.counterValue++;
    this.counterChanged.emit(this.counterValue);
}

subtract() {
    this.counterValue--;
    this.counterChanged.emit(this.counterValue);
}
Our completed counter-logic component should look like below
import { Component, Input, Output, EventEmitter } from '@angular/core';

    @Component({
        selector: 'counter-logic',
        styles: [`div { border: solid 1px green; margin: 10px; padding: 10px; }`],
        template: `
            <div>
                <h4>Counter Logic Component</h4>
                <button class="btn btn-default" (click)="add()">add</button>
                    <label>{{ counterValue }}</label>
                <button class="btn btn-default" (click)="subtract()">subtract</button>
            </div>
        `
    })
    export class CounterLogicComponent {
        @Input() counterValue: number = 0;
        @Output() counterChanged = new EventEmitter<number>();

        add() {
            this.counterValue++;
            this.counterChanged.emit(this.counterValue);
        }

        subtract() {
            this.counterValue--;
            this.counterChanged.emit(this.counterValue);
        }
    }
CounterComponent: Detect and handle the 'counterChanged' event
Time: 5 min
Now that the CounterLogicComponent is raising events, we need to add event binding syntax to the counter-logic component in the counter component template.
When the (counterChanged) event is raised, we want to call a function on our counter component called updateCurrentCount($event) and pass it the event passed out of our child counter-logic component.
In this situation, the emitted value '($event)' happens to be a number, if our add() method emitted a Person class, '$event' would be a person.
- Update the
counter-logicelement to handle thecounterChangedevent
<counter-logic [counterValue]="currentValue" (counterChanged)="updateCurrentCount($event)"></counter-logic>
- Add the
updateCurrentCount($event)function to update the value of the CounterComponentscurrentValueproperty to be the passed in value.
    updateCurrentCount(currentCount: number) {
        this.currentValue = currentCount;
    }
- When we look at our counter component we can see the corresponding Input and Output tags
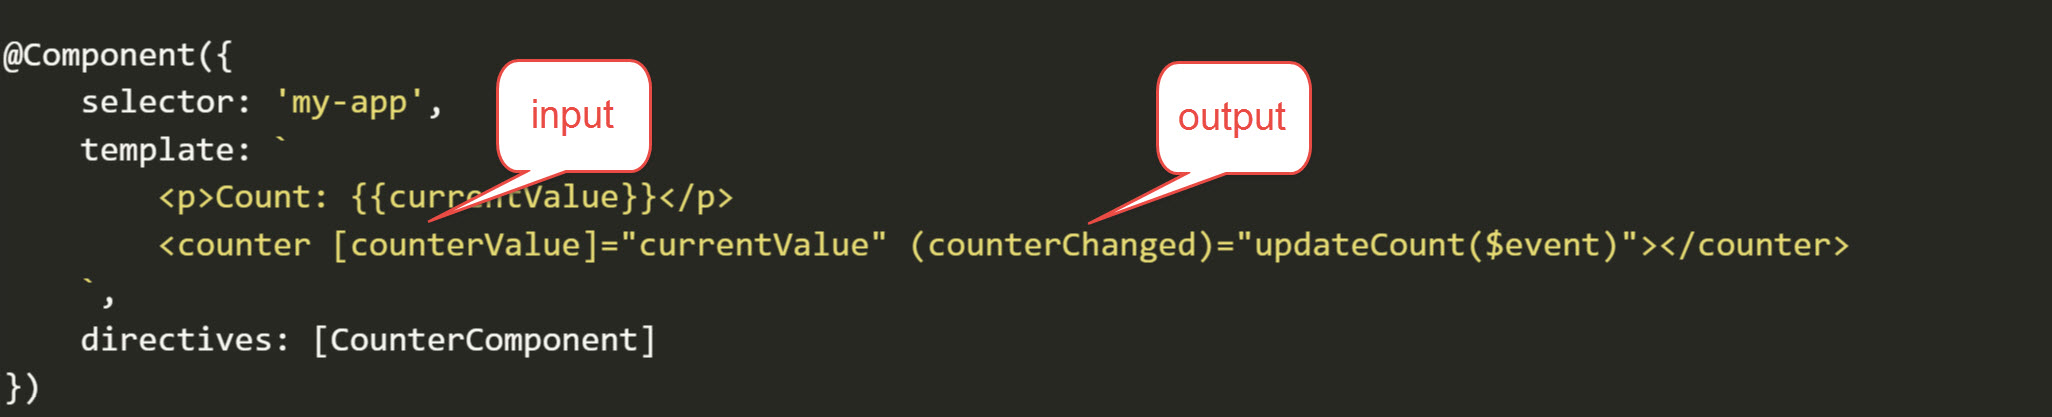
Figure: Corresponding input and output references in our counter component
The final code for the CounterComponent will be :
import { Component } from '@angular/core';

@Component({
    selector: 'counter',
    styles: [`div { border: solid 1px blue; margin: 10px; padding: 10px; }`],
    template: `
        <div>
            <h2>Counter Component</h2>
            <p>Count: {{currentValue}}</p>
            <counter-logic [counterValue]="currentValue" (counterChanged)="updateCurrentCount($event)"></counter-logic>
        </div>
        `
})
export class CounterComponent {
    currentValue: number = 5

    updateCurrentCount(currentCount: number) {
        this.currentValue = currentCount;
    }

}
Summary
Time: 5 min
In this module we learnt how to learnt how to communicate between components which is fundamental in building any Angular app.
View the Solution
To view the Counter Application code at this point
- Clone the SSW Simple Starter application by following these instructions.
- Checkout the 'counter-part-1-after' branch by executing
git checkout -t origin/counter-part-1-after